

Short Description
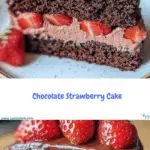
This Chocolate Strawberry Cake is a decadent dessert that combines rich, moist chocolate layers with a luscious strawberry buttercream frosting. Topped with fresh strawberries and a silky chocolate ganache, it’s a perfect treat for any special occasion or simply to satisfy your sweet tooth.
Why You’ll Love This Recipe
Rich Chocolate Flavor: The cake layers are deeply chocolatey, providing a perfect base for the sweet strawberry frosting.
Fresh Strawberry Buttercream: Made with real strawberries, the buttercream adds a fruity contrast to the rich chocolate.
Elegant Presentation: With its layers and garnishes, this cake is as beautiful as it is delicious.
Versatile for Occasions: Ideal for birthdays, anniversaries, or any celebration.
Make-Ahead Friendly: The cake can be prepared in advance, making party planning easier.
Ingredients
(Tip: You can find the complete list of ingredients and their measurements in the recipe card below.)
For the Chocolate Cake:
2 cups all-purpose flour
2 cups granulated sugar
¾ cup unsweetened cocoa powder
2 teaspoons baking powder
1½ teaspoons baking soda
1 teaspoon salt
1 cup whole milk
½ cup vegetable oil
2 large eggs
2 teaspoons vanilla extract
1 cup boiling water
For the Strawberry Buttercream:
1 cup unsalted butter, softened
4 cups powdered sugar
½ cup fresh strawberry puree
1 teaspoon vanilla extract
For Garnish:
Fresh strawberries
Directions
Preheat the Oven: Set your oven to 350°F (175°C). Grease and flour three 9-inch round cake pans.
Prepare the Cake Batter:
In a large mixing bowl, combine the flour, granulated sugar, cocoa powder, baking powder, baking soda, and salt.
Add the milk, vegetable oil, eggs, and vanilla extract to the dry ingredients. Mix until well combined.
Carefully stir in the boiling water until the batter is smooth. The batter will be thin.
Bake the Cakes:
Divide the batter evenly among the prepared cake pans.
Bake for 30–35 minutes, or until a toothpick inserted into the center comes out clean.
Allow the cakes to cool in the pans for 10 minutes, then transfer to wire racks to cool completely.
Prepare the Strawberry Buttercream:
In a large bowl, beat the softened butter on high speed until creamy, about 1 minute.
Gradually add the powdered sugar, beating on low speed to start, then increasing to high until fluffy.
Mix in the fresh strawberry puree and vanilla extract, beating until the buttercream is light and fluffy.
Assemble the Cake:
Place one cake layer on a serving plate. Spread a layer of strawberry buttercream on top.
Repeat with the second and third layers, spreading buttercream between each layer.
Frost the top and sides of the cake with the remaining buttercream.
Garnish:
Decorate the top of the cake with fresh strawberries.
Servings and Timing
Servings: 12
Preparation Time: 30 minutes
Baking Time: 30–35 minutes
Cooling and Assembly Time: 1 hour
Total Time: Approximately 2 hours
bettycrocker.com
+17
chelsweets.com
+17
bonappetit.com
+17
mybakingaddiction.com
+8
bakingwithblondie.com
+8
wyldflour.com
+8
cambreabakes.com
+11
richanddelish.com
+11
allrecipes.com
+11
Variations
Chocolate Ganache Drip: Add a chocolate ganache drip over the top for extra decadence.
Strawberry Filling: Include a layer of fresh sliced strawberries between the cake layers for added texture.
Alternative Frosting: Use a cream cheese frosting flavored with strawberry puree for a tangy twist.
Cupcakes: Convert the recipe into cupcakes for individual servings.
Storage/Reheating
Refrigeration: Store the cake in an airtight container in the refrigerator for up to 5 days.
Freezing: Wrap individual slices in plastic wrap and freeze for up to 1 month. Thaw in the refrigerator before serving.
Reheating: Bring the cake to room temperature before serving for the best flavor and texture.
FAQs
Can I use frozen strawberries for the buttercream?
Yes, thaw and puree the frozen strawberries before incorporating them into the buttercream.
How do I make the cake layers even?
Use a kitchen scale to divide the batter evenly among the pans, and level the tops with a serrated knife after baking if necessary.
Can I make the cake in advance?
Yes, you can bake the cake layers a day ahead and store them tightly wrapped at room temperature. Assemble and frost the cake the next day.
What if I don’t have three 9-inch pans?
You can bake the cake in batches if you have fewer pans, or adjust the baking time if using different-sized pans.
Can I use strawberry jam instead of fresh puree?
Yes, but the flavor and sweetness may vary. Adjust the amount of powdered sugar accordingly.
How can I prevent the cake from sticking to the pans?
Ensure the pans are well-greased and floured, or use parchment paper liners for easy removal.
Is it necessary to use boiling water in the batter?
Yes, boiling water helps to bloom the cocoa powder, enhancing the chocolate flavor and ensuring a moist texture.
Can I add chocolate chips to the batter?
Absolutely. Fold in ½ to 1 cup of chocolate chips for added texture and chocolate flavor.
What’s the best way to slice the cake cleanly?
Use a sharp knife dipped in hot water and wiped dry between cuts for neat slices.
Can I use this recipe for cupcakes?
Yes, adjust the baking time to 18–22 minutes and fill cupcake liners about 2/3 full.
Conclusion
This Chocolate Strawberry Cake is a delightful fusion of rich chocolate and fresh strawberry flavors, making it a standout dessert for any occasion. Its moist layers, fruity buttercream, and elegant presentation are sure to impress your guests and satisfy your sweet cravings.

Chocolate Strawberry Cake
- Prep Time: 30 minutes
- Cook Time: 10minutes
- Total Time: 40 minutes
- Yield: 12 slices
- Category: Dessert
- Method: No-Bake (except crust)
- Cuisine: Fusion
- Diet: Vegetarian
Description
This Elegant Pistachio Raspberry Crunch Cheesecake is a stunning no-bake layered dessert with a graham cracker crust, silky raspberry and pistachio mousse layers, and a decadent white chocolate topping. Bursting with flavor and texture, it’s perfect for special occasions or luxurious indulgence.
Ingredients
For the Crust:
-
1 1/2 cups graham cracker crumbs
-
1/4 cup granulated sugar
-
1/2 cup unsalted butter, melted
For the Raspberry Mousse:
-
1 cup fresh raspberries
-
1/4 cup granulated sugar
-
1 tbsp lemon juice
-
1 cup heavy cream, whipped
For the Pistachio Mousse:
-
1 cup pistachio paste
-
1/4 cup granulated sugar
-
1 cup heavy cream, whipped
For the Topping:
-
1 cup white chocolate, melted
-
1/2 cup fresh raspberries
-
1/4 cup pistachios, chopped
Instructions
-
Preheat oven to 325°F (165°C). Grease a 9-inch springform pan.
-
Make the Crust:
-
Mix graham cracker crumbs, sugar, and melted butter in a bowl.
-
Press firmly into the bottom of the pan. Bake for 10 minutes, then cool completely.
-
-
Prepare Raspberry Mousse:
-
In a small saucepan, cook raspberries, sugar, and lemon juice over medium heat for 10 minutes until thickened.
-
Let cool, then fold into whipped cream.
-
Spread over cooled crust and refrigerate until set.
-
-
Prepare Pistachio Mousse:
-
Mix pistachio paste and sugar.
-
Fold in whipped cream until smooth and fluffy.
-
Spread gently over the raspberry mousse layer.
-
Sprinkle with chopped pistachios and refrigerate.
-
-
Add Topping:
-
Pour melted white chocolate over the top.
-
Garnish with fresh raspberries and additional chopped pistachios.
-
-
Chill & Serve:
-
Refrigerate for at least 4 hours or overnight for best texture.
-
Slice and serve chilled.
-
Notes
-
For a nut-free version, replace pistachio mousse with white chocolate mousse.
-
Use a food processor for finely crushed graham crackers.
-
Decorate just before serving to keep toppings fresh.
Your email address will not be published. Required fields are marked *