
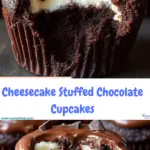
Decadent and rich, these Cheesecake Stuffed Chocolate Cupcakes are the ultimate indulgence for dessert lovers. Each moist chocolate cupcake hides a creamy cheesecake center, making every bite a delightful surprise. Perfect for parties, special occasions, or when you simply want to treat yourself, these cupcakes combine two classic desserts into one irresistible treat.
Why You’ll Love This Recipe
These cupcakes are not your average chocolate treat. With a soft, fluffy chocolate base and a tangy-sweet cheesecake center, they bring together the best of both worlds. The luscious melted chocolate topping adds an extra layer of richness that will satisfy even the most devoted chocolate lover. They’re easy to prepare, freezer-friendly, and sure to impress anyone who takes a bite.
Ingredients
(Tip: You can find the complete list of ingredients and their measurements in the recipe card below.)
For the Cupcakes:
2 cups semisweet chocolate chips, divided
1 1/2 cups all-purpose flour
1 tsp baking soda
1/2 tsp salt
1/2 cup granulated sugar
1/3 cup vegetable oil
1 large egg
1 tsp vanilla extract
1 cup water
For the Cheesecake Filling:
6 oz cream cheese, room temperature
1/4 cup granulated sugar
1 large egg
1/8 tsp salt
1 cup semisweet chocolate chips
Directions
Preheat the Oven:
Preheat your oven to 350°F (175°C). Line two muffin tins with 16 paper cupcake liners.
Melt Chocolate for the Batter:
In a microwave-safe bowl, melt 1/2 cup of the chocolate chips for 45 seconds. Stir, then heat in 10-second bursts until smooth. Set aside to cool slightly.
Make the Cupcake Batter:
In a medium bowl, whisk together flour, baking soda, and salt.
In a large bowl, whisk sugar, oil, egg, and vanilla until combined. Stir in the melted chocolate.
Gradually add the flour mixture, alternating with water, mixing until just combined. Batter will be thin.
Make the Cheesecake Filling:
In a separate bowl, beat cream cheese, sugar, egg, and salt until smooth and creamy. Stir in 1 cup of chocolate chips.
Assemble the Cupcakes:
Fill each liner halfway with chocolate batter.
Add about 1 tablespoon of cheesecake filling on top of the batter.
Cover the filling with more chocolate batter.
Bake the Cupcakes:
Bake for 20–25 minutes, or until a toothpick inserted in the center comes out clean.
Add Final Chocolate Topping:
Immediately after baking, sprinkle the remaining 1/2 cup of chocolate chips on top of the hot cupcakes. Let sit for 5 minutes, then gently spread the melted chips to create a smooth topping.
Cool & Serve:
Allow the cupcakes to cool in the pan for 10 minutes before transferring them to a wire rack to cool completely.
Servings and timing
Prep Time: 15 minutes
Cook Time: 25–30 minutes
Total Time: 40–45 minutes
Yield: 16 cupcakes
Variations
-
Mint Chocolate Cheesecake Cupcakes: Add 1/4 teaspoon of peppermint extract to the cheesecake filling for a refreshing twist.
-
Peanut Butter Version: Replace 1/2 of the chocolate chips in the filling with peanut butter chips.
-
Gluten-Free Option: Substitute the all-purpose flour with a gluten-free flour blend.
-
Coffee Infused: Use brewed coffee instead of water in the batter to enhance the chocolate flavor.
-
Nutty Delight: Stir chopped walnuts or pecans into the cheesecake mixture for added texture.
Storage/Reheating
Storage:
Store cupcakes in an airtight container in the refrigerator for up to 5 days.
Freezing:
Wrap each cupcake tightly in plastic wrap and place in a freezer-safe bag or container. Freeze for up to 2 months.
Reheating:
Thaw overnight in the refrigerator. To warm, microwave each cupcake for 10–15 seconds or until slightly warm and gooey.
FAQs
How do I know when the cupcakes are done baking?
Insert a toothpick into the center of a cupcake. If it comes out clean or with a few moist crumbs (not raw batter), they’re ready.
Can I use milk chocolate chips instead of semisweet?
Yes, though it will result in a sweeter cupcake. Semisweet balances the richness better.
Can I make these cupcakes ahead of time?
Absolutely. You can bake them a day in advance and store in the fridge until ready to serve.
Do I have to melt chocolate for the batter?
Yes, melting some of the chocolate enhances the depth of flavor in the cupcake base.
Can I omit the cheesecake filling?
You can, but the cheesecake filling is what makes these cupcakes unique.
Is it possible to make these without eggs?
You may try using egg substitutes like applesauce or flaxseed meal, though texture may vary.
Why is my batter so thin?
This is expected—the water makes the batter loose, resulting in moist and tender cupcakes.
Can I add frosting instead of melted chocolate topping?
Yes, a cream cheese or chocolate ganache frosting would pair nicely.
Can I double the recipe?
Yes, you can double all ingredients to make 32 cupcakes. Bake in batches if needed.
Do these need to be refrigerated?
Yes, due to the cream cheese filling, they should be stored in the refrigerator.
Conclusion
Cheesecake Stuffed Chocolate Cupcakes offer a deliciously unexpected twist on a traditional dessert. With a moist chocolate crumb, luscious cheesecake core, and rich chocolate topping, they’re a show-stopping treat ideal for celebrations or simply satisfying a sweet craving. Easy to make and loved by all, this recipe is a must-try for any home baker.
Print
Cheesecake Stuffed Chocolate Cupcakes
- Prep Time: 15 minutes
- Cook Time: 25–30 minutes
- Total Time: 0 hours
- Yield: 16 cupcakes
- Category: Dessert
- Method: Baking
- Diet: Vegetarian
Description
Indulge in the ultimate dessert fusion with these Cheesecake Stuffed Chocolate Cupcakes. Moist, rich chocolate cupcakes are filled with a creamy cheesecake center and topped with a luscious melted chocolate layer. Perfect for parties, holidays, or any sweet craving! Keywords: cheesecake stuffed cupcakes, chocolate cheesecake cupcakes, stuffed chocolate cupcakes, chocolate dessert cupcakes
Ingredients
For the Cupcakes:
-
2 cups (340g) semisweet chocolate chips, divided
-
1 1/2 cups (187g) all-purpose flour
-
1 tsp baking soda
-
1/2 tsp salt
-
1/2 cup (100g) granulated sugar
-
1/3 cup (66g) vegetable oil
-
1 large egg
-
1 tsp vanilla extract
-
1 cup water
For the Cheesecake Filling:
-
6 oz (170g) cream cheese, room temperature
-
1/4 cup (50g) granulated sugar
-
1 large egg
-
1/8 tsp salt
-
1 cup semisweet chocolate chips
Instructions
-
Preheat the Oven:
Preheat oven to 350°F (175°C) and line two muffin tins with 16 cupcake liners. -
Melt Chocolate for Batter:
Melt 1/2 cup chocolate chips in a microwave-safe bowl (45 seconds, then in 10-second increments). Stir until smooth and set aside to cool. -
Make Cupcake Batter:
In a medium bowl, whisk flour, baking soda, and salt.
In a large bowl, whisk sugar, oil, egg, and vanilla. Stir in melted chocolate.
Gradually add the flour mixture and water alternately, mixing until just combined. Batter will be thin. -
Make Cheesecake Filling:
Beat cream cheese, sugar, egg, and salt until smooth. Stir in 1 cup chocolate chips. -
Assemble the Cupcakes:
Fill cupcake liners halfway with chocolate batter. Add 1 tbsp cheesecake filling on top, then cover with remaining chocolate batter. -
Bake:
Bake for 20–25 minutes, or until a toothpick comes out clean. -
Add Chocolate Topping:
While hot, sprinkle remaining 1/2 cup chocolate chips on top. Let melt for 5 minutes, then spread gently. -
Cool & Serve:
Let cupcakes cool in pan for 10 minutes before transferring to a wire rack.
Notes
-
You can use mini chocolate chips for the cheesecake layer for a more even distribution.
-
Store leftovers in an airtight container in the fridge for up to 5 days.
-
These cupcakes freeze well—wrap individually and store up to 2 months.
Your email address will not be published. Required fields are marked *